
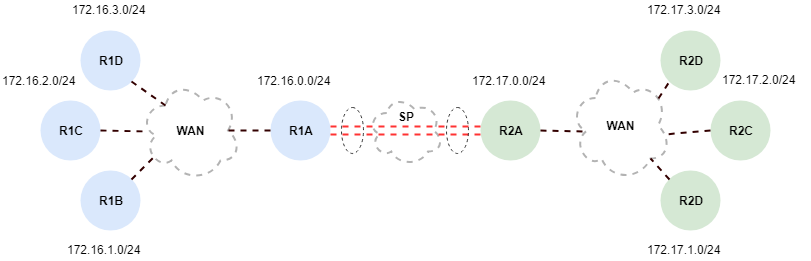
In most real world situation Site to Site VPN Tunnels are usually created between a pair Firewalls, however that is not the only way to achieve secure Site to Site encryption. For that matter one method is just as good as the other. It all depends on your situation and environment. In this example I’m not using a Tunnel interface for the overlay such as GRE. Instead I’m just using the raw interfaces and adding the encryptions. At the end of the day it’s still a tunnel, but without the overlay.
ISAKMP
Internet Security Agreement Key Management Protocol or ISAKMP provides a way for Routers or Firewalls to agree on a set of security settings and the ability to exchange predefined keys. With the Phase one ISAKMP agreement in place the Routers or Firewalls can begin the process of Phase 2 exchanging the Security Association or SA’s. The SA’s contain all the information necessary for secure communication. The SA’s contains the policy agreement security information such as the key lengths.
Cisco IPSEC Key Terms and Technology
Configuration Tasks
- Define and create ISAKMP Policy and define authentication
- Define and create ACL’s for interesting traffic
- Define and create the Transform Sets
- Define and create the Crypto Maps and associate Transform Sets
- Apply the Crypto Maps to public interfaces
In a real world scenario the Service Provider’s routing would be handled dynamicaly, but for the sake of this examlpe I’ll be confiuring the Service Provider’s routing manually.
Lets start off by getting the Service Provider’s Router SP up and running
SP#configure terminal
SP(config)#interface s0/0
SP(config-if)#ip address 23.80.0.1 255.255.255.252
SP(config-if)#no shutdown
SP(config-if)#interface s0/1
SP(config-if)#ip address 23.90.0.1 255.255.255.252
SP(config-if)#no shutdown
SP(config-if)#exit
SP(config)#ip route 172.16.0.0 255.255.0.0 23.80.0.2
SP(config)#ip route 172.17.0.0 255.255.0.0 23.90.0.2
SP(config)#
Lets make sure the Service Provider’s not forwarding any private addresses across the Internet. A common task preformed by the Service provider would be to BLOCK the entire private address range in accordance with RFC 1918. We can create a single ACL that will conform to RFC 1918, and apply it to the public facing interfaces on the Service Providers router.
SP(config)#ip access-list extended 1918
SP(config-ext-nacl)#deny ip 10.0.0.0 0.255.255.255
SP(config-ext-nacl)#deny ip 172.16.0.0 0.15.255.255
SP(config-ext-nacl)#deny ip 192.168.0.0 0.0.255.255
SP(config-ext-nacl)#permit ip any any
SP(config-ext-nacl)#exit
SP(config)#interface s0/0
SP(config-if)#ip access-group 1918 in
SP(config-if)#interface s0/1
SP(config-if)#ip access-group 1918 in
SP(config-if)#end
SP#
Now we can move onto the configuration of R1A’s public facing interface along with the static route
R1A#configure terminal
R1A(config)#interface s0/0
R1A(config-if)#ip address 23.80.0.2 255.255.255.252
R1A(config-if)#no shutdown
R1A(config-if)#exit
R1A(config)#ip route 0.0.0.0 0.0.0.0 28.80.0.1
R1A(config)#end
R1A#
Lets basically do the inverse configuration on Router R2A along with the static route
R2A#configure terminal
R2A(config)#interface s0/0
R2A(config-if)#ip address 23.90.0.2 255.255.255.252
R2A(config-if)#no shutdown
R2A(config-if)#exit
R2A(config)#ip route 0.0.0.0 0.0.0.0 23.90.0.1
R2A(config)#end
R2A#
At this point we have the basic configuration in place for routing traffic across the public interfaces between Router R1A, and Router R2A, however any traffic sourced between the 6 networks is currently not encrypted..! This is a major problem so lets make sure the traffic sourced from 172.16.0.0 – 172.16.3.0 is encrypted. Lets start out by configuring the IPSEC Phase 1 negotiation.
R1A#configure terminal
R1A(config)#crypto isakamp policy 1
R1A(config-isakmp)#authentication pre-share
R1A(config-isakmp)#exit
R1A(config)#crypto isakmp key B2B address 23.90.0.2
R1A(config)#
Now lets do the same thing for IPSEC Phase 1 on Router R1B. This is a really easy place to make a common mistake when your configuring the Phase one negotiation. For example if I happened to configure the wrong ISAKMP Key address lets say 23.80.0.1 as opposed to 23.80.0.2 the Tunnel wouldn’t come up.
R2A#configure terminal
R2A(config)#crypto isakamp policy 1
R2A(config-isakmp)#authentication pre-share
R2A(config-isakmp)#exit
R2A(config)#crypto isakmp key B2B address 23.80.0.2
R2A(config)#
The next thing we need to do is define the interesting traffic that’s allow to traverse the tunnel
R1A(config)#ip access-list extended 100
R1A(config-ext-nacl)#permit ip 172.16.0.0 0.0.255.255 172.17.0.0 0.0.255.255
R1A(config-ext-nacl)#exit
R1A(config)#
Now we need to the inverse of the above ACL on Router R1A
R2A(config)#ip access-list extended 100
R2A(config-ext-nacl)#permit ip 172.17.0.0 0.0.255.255 172.17.0.0 0.0.255.255
R2A(config-ext-nacl)#exit
R2A(config)#
Now that we have our ACL’s in place on both sides lets move onto to the task of creating the IPSEC Transform Set
R1A(config)#crypto ipsec transfrom-set B2B esp-sha-hmac esp-aes
Now lets do the vary same thing with the Transform Set on the other side on Router R1B
R1B(config)#crypto ipsec transfrom-set B2B esp-sha-hmac esp-aes
Now we need to put all the components together within the Crypto Map
R1A(config)#crypto map B2B 1 ipsec-isakmp
R1A(config-crypto-map)#set transfrom-set B2B
R1A(config-crypto-map)#set peet 23.90.0.2
R1A(config-crypto-map)#match address 100
R1A(config-crypto-map)#exit
R1A(config)#
Now lets configure the same Crypto Map on Router R1B
R2A(config)#crypto map B2B 1 ipsec-isakmp
R2A(config-crypto-map)#set transfrom-set B2B
R2A(config-crypto-map)#set peet 23.90.0.2
R2A(config-crypto-map)#match address 100
R2A(config-crypto-map)#exit
R2A(config)#
Now lets apply the Crypto Map B2B to outside public interface on R1A
R1A(config)#interface s0/0
R1A(config-if)#crypto map B2B
R1A(config-if)#exit
R1A#
Now lets apply the Crypto Map on the others side on Router B2B’s public interface
R2A(config)#interface s0/0
R2A(config-if)#crypto map B2B
R2A(config-if)#exit
R2A#
Now lets initiate some interesting ICMP traffic from Router R1A toward Router R1B.
R1A#ping 172.17.0.1 source 172.16.0.1 repeat 3
Sending 3, 100-byte ICMP Echos to 172.17.0.1, timeout is 2 seconds:
Packet sent with a source address of 172.16.0.1
!!!
Success rate is 100 percent (3/3), round-trip min/avg/max = 16/33/48 ms
R1A#
Based on the above output we have successfully initiated interesting traffic that conforms to the ACL we created early in the configuration. Now we can take a look at the security associations that were built between Router R1A, and Router R2A.
R1A#show crypto ipsec sa

interface: Serial1/0
 Crypto map tag: B2B, local addr 23.80.0.2

   protected vrf: (none)
   local ident (addr/mask/prot/port): (172.16.0.0/255.255.0.0/0/0)
   remote ident (addr/mask/prot/port): (172.17.0.0/255.255.0.0/0/0)
   current_peer 23.90.0.2 port 500
   PERMIT, flags={origin_is_acl,}
   #pkts encaps: 23, #pkts encrypt: 23, #pkts digest: 23
   #pkts decaps: 18, #pkts decrypt: 18, #pkts verify: 18
   #pkts compressed: 0, #pkts decompressed: 0
   #pkts not compressed: 0, #pkts compr. failed: 0
   #pkts not decompressed: 0, #pkts decompress failed: 0
   #send errors 0, #recv errors 0

   local crypto endpt.: 23.80.0.2, remote crypto endpt.: 23.90.0.2
   path mtu 1500, ip mtu 1500, ip mtu idb Serial1/0
   current outbound spi: 0xE186513C(3783676220)
   PFS (Y/N): N, DH group: none

   inbound esp sas:
    spi: 0x4F346(324422)
     transform: esp-aes esp-sha-hmac ,
     in use settings ={Tunnel, }
     conn id: 1, flow_id: 1, sibling_flags 80004040, crypto map: B2B
     sa timing: remaining key lifetime (k/sec): (4340270/2593)
     IV size: 16 bytes
     replay detection support: Y
     Status: ACTIVE(ACTIVE)

 inbound ah sas:

 inbound pcp sas:

   outbound esp sas:
    spi: 0xE186513C(3783676220)
     transform: esp-aes esp-sha-hmac ,
     in use settings ={Tunnel, }
     conn id: 2, flow_id: 2, sibling_flags 80004040, crypto map: B2B
     sa timing: remaining key lifetime (k/sec): (4340269/2593)
     IV size: 16 bytes
     replay detection support: Y
     Status: ACTIVE(ACTIVE)

 outbound ah sas:

 outbound pcp sas:
R1A#
I hope you found this post on IPSEC Tunneling helpful and informative. Be sure to let me know what you think by leaving your suggestions, and feedback in the comments section below. You can find out more about these and other articles be checking out recent posts and archives. To learn more about myself be sure to check out the About page. And as always thanks again for visiting The Packet.