When it comes to policing or proxying corporate Web traffic there are a lot of options to choose from. The most common being client PAC files along with WCCP, and on premise proxy Servers or the like. The enforcement of Company policies, and restrictions around the use of the Web has always been a challenge so find the right solution is important. Another option would be to move your Proxy, and Company policies to a hosted Cloud solution. Depending on the hosted solution you choose they may offer the ability to Tunnel Client Web traffic to their Proxy Servers. The burden or overhead related with encrypting the traffic is really necessary in most cases because the Proxy is still acting on behalf of the Client. 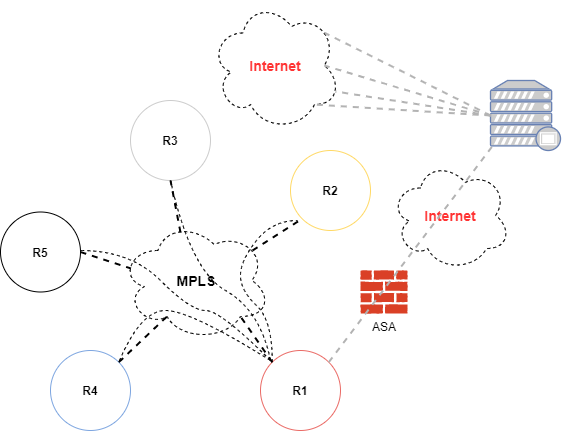
If you decided to go with a hosted Proxy solution it may require some additional work on the network side. The above diagram poses a couple of challenge’s or goals depending on how you look at it. The first of which is due to the fact that Cisco ASA firewalls don’t support the termination of GRE tunnels. The second challenge or hurdle is terminating the tunnel on the inside on router in this case R1. Let’s also assume that the internet connection is the DR or backup connection so traffic is not normally destined toward this firewall.
Possible Use Cases
- Proxy Application
- Business To Business Application
- Compliance Application
- End To End Tunneling
Due to the fact that primary internet traffic is flowing through another ASA firewall we need to account for routing. Let’s assume that the terminating Cloud point-to-point network is 200.20.1.29/30, and the Cloud application network is 172.18.1.0/24. Let’s also assume that the inside interface of the ASA firewall is 172.16.1.4. So from router R1 let’s make sure that any traffic destined for this cloud application is routed through the correct ASA firewall.
R1#configure terminal
R1(config)#ip route 200.20.1.29 255.255.255.252 172.16.1.4
R1(config)#
Now that we have our tunnel related traffic routing outside let’s get started by configuring a loopback interface on router R1 that we can use as the GRE source address for the Tunnel.
R1(config)#interface loopback 1
R1(config-if)#ip address 10.0.0.1 255.255.255.255
R1(config-if)#end
R1#
The next thing we need to do is configure the actual Tunnel interface on router R1.
R1#configure terminal
R1(config)#interface tunnel 0
R1(config-if)#ip address 200.20.1.31 255.255.255.252
R1(config-if)#ip tcp adjust-mss 1466
R1(config-if)#tunnel source loopback 1
R1(config-if)#tunnel destination 200.20.1.30
R1(config-if)#exit
R1(config)#
Now that we have the Tunnel interface up and running lets add the static route for the Cloud application.
R1(config)#ip route 172.18.1.0 255.255.255.0 tunnel1
Now that we have the two static routes in place. One for the point-to-point GRE Tunnel, and the other for the Cloud Proxy application we can advertise the Cloud Proxy network via BGP. Lets assume an AS of 65001 for BGP.
R1(config)#router bgp 65001
R1(config-router)#network 172.18.1.0 mask 255.255.255.0
R1(config-router)#end
R1#
Now lets jump over to the ASA, and configure the Firewall objects for router R1’s loopback interface along with the Proxy Server. We’re also going to need to expose the R1’s loopback interface via NAT to the outside, so lets assume that 28.34.1.18 is our exposed public addresses for the GRE tunnel termination.
ASA#configure terminal
ASA(config)#object network R1
ASA(config-network-config)#host 10.0.0.1
ASA(config-network-config)#nat (inside,outside) static 28.34.1.18
ASA(config-network-config)#exit
ASA(config)#
Next lets configure the object that will be used for the cloud Proxy Server on the ASA Firewall.
ASA(config)#object network PROXY
ASA(config-network-config)#host 200.20.1.30
ASA(config-network-config)#end
ASA#
Now that we have both of the Firewall objects in place lets create the outside ACL for the GRE Tunnel.
ASA#configure terminal
ASA(config)#access-list outside line 1 permit gre object R1 object PROXY
ASA(config)#access-list outside line 2 permit gre object PROXY object R1
ASA(config)#end
ASA#
Now that everything is in place lets take a look at the actual GRE related traffic as it passes through the ASA.
ASA#show conn | grep GRE
GRE outside 200.20.1.30:0 inside 10.0.0.1:0, idle 0:00:00, bytes 1551726170, flags E
GRE outside 200.20.1.30:0 inside 10.0.0.1:0, idle 0:00:00, bytes 3653492458, flags E
ASA#
In most cases you can actually look at connection oriented traffic on the ASA such as TCP or UDP without any additional filtering, however with GRE that’s not the case. It’s a listed connection protocol, but you can’t specify it with the show conn command. This may be a version limitation I’m not sure. I built this configuration on ASA running version 8.4.1.
I hope you found this post on Cloud Tunneling helpful and informative. Be sure to let me know what you think by leaving suggestions, and feedback in the comments section below. You can find out more about these and other articles be checking out recent posts and archives. To learn more about me be sure to check out the About page. And as always thanks again for visiting The Packet.